{tocify} $title={Table of Contents}
I have tried to cover basic understanding around AD authentication in following post- Understanding Azure Active Directory Authentication and Authorization using Oauth
Adding function App in ASE also makes it secure, as ASE becomes a part of Virtual Network.
Two objects are created in the Azure AD instance. The first one, the application object, serves as a unique, global representation of the application and its properties.
Second object is created, a service principal object. This is basically a security principal (object used to delegate permissions) that defines the set of permissions that the application object will get in the current Azure AD instance.
Navigate to the Azure Portal and click Create a resource.
In the Search Box type Function, and select Function App, then click Create.
You will need to provide an App name (DevT), Resource Group, Hosting plan and Storage account.
Navigate to the newly created function app, click Functions and click the “+” icon to add a new function.
Choose http trigger function, give it a name (TargetFunctionHttpTrigger) and save the function.
Now we have the function app and Azure AD app, next is to Turn on App Service Authentication/Authorization and associate both
Navigate back to the Azure Function App and click on Platform Features, and then click on Authentication/Authorization.
Set Action to take when request is not authenticated to Log in with Azure Directory.
Click Azure Active Directory in the list of Authentication Providers. Under Express mode, you will get two options create new or select existing.
As we have already created one, choose that
In this function we are going to call the above created Target function, but it is secured with Azure AD.
So first we need to get access token, and to request token we need following info
Tenant ID(Directory ID) -- It is the authority which grants the token
AudienceID - For whom the token will be created i.e.Target AD App's client ID
Client ID and Client Secret - It is caller AD app's details, this proves client identity
The input values are added in App Settings of function App and are accessed at runtime.
AuthenticationContext is used to acquire an Azure access token by passing it above inputs.
To use it install the following NuGet package for your project:
Microsoft.IdentityModel.Clients.ActiveDirectory;
Following is code to get access token
'authority' Uri should have at least one segment in the path
Web deployment task failed - cannot modify the file 'xxx.dll' on the destination because it is locked by an external process.
Introduction
By default Function Apps are public in nature i.e. you can access it over internet without any restriction (anonymous access). However that is not the only thing, you can restrict the access by enabling access with function level authorization(Host keys).
So the caller/client has to have the key and sent it along with request, thus adding security to function App.
Second option which is available is securing Function App using Azure Active Directory(Oauth standard). This is what we will explore with an example.
I have tried to cover basic understanding around AD authentication in following post- Understanding Azure Active Directory Authentication and Authorization using Oauth
There is one more way to add security to function app - by using Azure APIM
Adding function App in ASE also makes it secure, as ASE becomes a part of Virtual Network.
Azure Active Directory Application
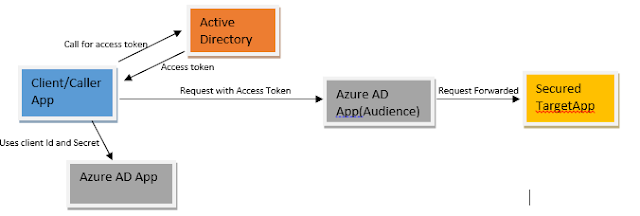
When we say securing Function App with Azure AD it means whoever has to access the function app needs to get a access token from Azure AD Tenant(Authority) in which function app resides and present it along with the request which will be validated by Azure AD application associated with the function App and only after validation is done request is forwarded to function app.
Thus function App gives away the task of security check to Azure AD Application (no code required in function).
To do this we need to create/register an Application in Azure Active directory and associate it with the function app which is to be secured. It is also called as Audience.
Also in order for caller/client app to get the access token it needs to first authenticate itself with Azure AD and AD authenticates only those whose information is with it. So for creating identity in targeted AD, caller has to register an application with it.
Thus if app needs to request Azure AD logon tokens or consume Azure AD logon tokens, then it must be an Azure AD application
Caller/client app uses above created AD apps identity (clientID and Secret/Certificate) and presents it to the Authority (Azure Active Directory Tenant) and gets access token.
Access token along with request is sent to target function app, which gets intercepted by Audience (Target AD app). It validates it and if all ok then forwards request to function app.
The application registration in your tenant enables you and others to authenticate against your Azure Active Directory.
So what actually happens when you register an application in Azure AD?
Two objects are created in the Azure AD instance. The first one, the application object, serves as a unique, global representation of the application and its properties.
Second object is created, a service principal object. This is basically a security principal (object used to delegate permissions) that defines the set of permissions that the application object will get in the current Azure AD instance.
Steps to secure Function App using Azure AD
Register an Application with Active directory (Target AD App - Audience)
- Sign in to your Azure Account through the Azure portal.
- Select Azure Active Directory.
- Select App registrations.
- Select New registration.
- Name the application. Select a supported account type, which determines who can use the application. Under Redirect URI, select Web for the type of application you want to create. Enter the URI where the access token is sent to.
Below is what you should see
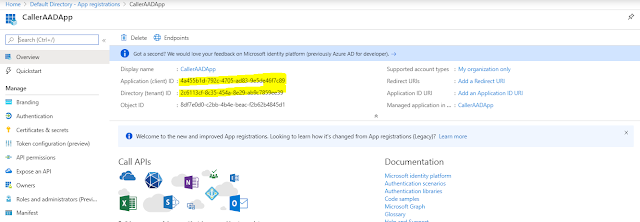
Make note of Application(Client) ID -- this will be used as Audience by caller app when access is requested.
Create a Target function
Navigate to the Azure Portal and click Create a resource.
In the Search Box type Function, and select Function App, then click Create.
You will need to provide an App name (DevT), Resource Group, Hosting plan and Storage account.
Navigate to the newly created function app, click Functions and click the “+” icon to add a new function.
Choose http trigger function, give it a name (TargetFunctionHttpTrigger) and save the function.
Enable AD authentication
Now we have the function app and Azure AD app, next is to Turn on App Service Authentication/Authorization and associate both
Navigate back to the Azure Function App and click on Platform Features, and then click on Authentication/Authorization.
Turn on App service authentication
Click Azure Active Directory in the list of Authentication Providers. Under Express mode, you will get two options create new or select existing.
As we have already created one, choose that
Steps to call secured Azure Function App
Register an Application with Active directory (Caller AD App)
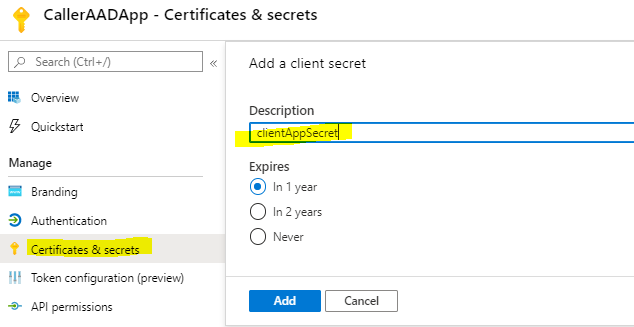
As this app will be used to get token, we need to make note of Application(client) ID and also need to create a secret
Remember to copy and save the secret as it won't be visible later
Create a caller Azure function
In this function we are going to call the above created Target function, but it is secured with Azure AD.
So first we need to get access token, and to request token we need following info
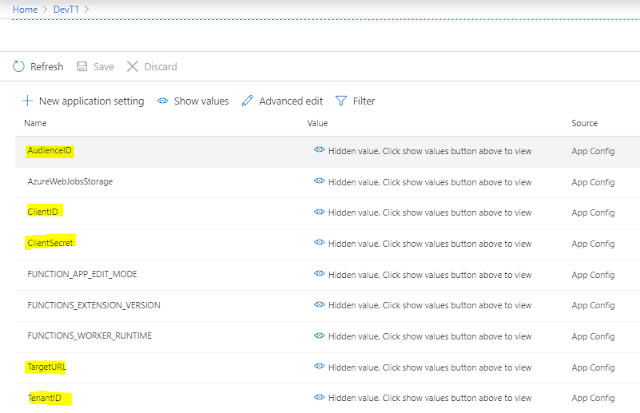
Tenant ID(Directory ID) -- It is the authority which grants the token
AudienceID - For whom the token will be created i.e.Target AD App's client ID
Client ID and Client Secret - It is caller AD app's details, this proves client identity
The input values are added in App Settings of function App and are accessed at runtime.
AuthenticationContext is used to acquire an Azure access token by passing it above inputs.
To use it install the following NuGet package for your project:
Microsoft.IdentityModel.Clients.ActiveDirectory;
Following is code to get access token
AuthenticationContext authenticationContext = new AuthenticationContext("https://login.microsoftonline.com/"+ Environment.GetEnvironmentVariable("TenantID"));
ClientCredential clientCredential = new ClientCredential(Environment.GetEnvironmentVariable("ClientID"),Environment.GetEnvironmentVariable("ClientSecret"));
AuthenticationResult authenticationResult = authenticationContext.AcquireTokenAsync(Environment.GetEnvironmentVariable("AudienceID"),clientCredential).Result;
And following is code to make call along with access token (added in header)
httpClient.DefaultRequestHeaders.Authorization = newSystem.Net.Http.Headers.AuthenticationHeaderValue("Bearer", authenticationResult.AccessToken);
var content = new StringContent(body,Encoding.UTF8, "application/json");
response = httpClient.PostAsync(Environment.GetEnvironmentVariable("TargetURL"), content).Result;
Below is full code of caller function, publish it and that's it
using System;
using System.IO;
using System.Threading.Tasks;
using Microsoft.AspNetCore.Mvc;
using Microsoft.Azure.WebJobs;
using Microsoft.Azure.WebJobs.Extensions.Http;
using Microsoft.AspNetCore.Http;
using Microsoft.Extensions.Logging;
using Newtonsoft.Json;
using System.Net.Http;
using System.Text;
using Microsoft.IdentityModel.Clients.ActiveDirectory;
namespace DevT
{
public static class CallerFunctionHttpTrigger
{
[FunctionName("CallerFunctionHttpTrigger")]
public static async Task<IActionResult> Run(
[HttpTrigger(AuthorizationLevel.Function, "get", "post", Route = null)] HttpRequest req,
ILogger log)
{
log.LogInformation("C# HTTP trigger function processed a request.");
string requestBody = await new StreamReader(req.Body).ReadToEndAsync();
HttpResponseMessage Targetresp = PostMessage(requestBody);
return Targetresp != null
? (ActionResult)new OkObjectResult($"Hello, {Targetresp.Content.ReadAsStringAsync().Result}")
: new BadRequestObjectResult("Please pass a name on the query string or in the request body");
}
public static HttpResponseMessage PostMessage(string body)
{
HttpResponseMessage response;
AuthenticationContext authenticationContext = new AuthenticationContext("https://login.microsoftonline.com/"+ Environment.GetEnvironmentVariable("TenantID"));
ClientCredential clientCredential = new ClientCredential(Environment.GetEnvironmentVariable("ClientID"),Environment.GetEnvironmentVariable("ClientSecret"));
AuthenticationResult authenticationResult = authenticationContext.AcquireTokenAsync(Environment.GetEnvironmentVariable("AudienceID"),clientCredential).Result;
using (var httpClient = new HttpClient())
{
httpClient.DefaultRequestHeaders.Authorization = newSystem.Net.Http.Headers.AuthenticationHeaderValue("Bearer", authenticationResult.AccessToken);
var content = new StringContent(body,Encoding.UTF8, "application/json");
response = httpClient.PostAsync(Environment.GetEnvironmentVariable("TargetURL"), content).Result;
}
return response;
}
}
}
|
Errors encountered while working on this demo
'authority' Uri should have at least one segment in the path
Web deployment task failed - cannot modify the file 'xxx.dll' on the destination because it is locked by an external process.
If you have questions or suggestions, feel free to do in comments section below !!!
Do share if you find this helpful .......
Knowledge Sharing is Caring !!!!!!
Learn More about Logic App
- Understanding Azure Active Directory Authentication and Authorization using Oauth
- Securing Function App with Azure Active Directory authentication
- BizTalk Developer getting started with Logic App
- Getting Started with Logic Apps - Fundamentals
- Getting Started with Logic Apps - Enterprise Application Integration
- Getting Started with Logic Apps - AS2
- Getting Started with Logic Apps - EDI X12 Fundamentals
- Getting Started with Logic Apps - XML to EDI X12
- Getting Started with Logic Apps - EDI X12 to XML
- Getting Started with Logic Apps - What happened to the Request?
- Inserting Multiple Records In On Prem SQL Using Logic App
- Inserting data in On Premises SQL Database using Logic Apps
- Installing and Configuring On Premises Data Gateway - By adding user to Active Directory
- XML Batching(Aggregation) in Logic App
- Batching(Aggregating) messages in Logic App
- Debatching(Splitting) JSON Message in Logic Apps - ForEach and SplitOn
- Debatching(Splitting) XML Message in Logic Apps - ForEach and SplitOn
- Securing Logic App with Azure Active Directory authentication
- Removing ns0: prefix from xml output from BizTalk/Logic app XSLT map
- Using Managed Identity in Logic Apps for Calling Active Directory Secured Function App
- Logic Apps : Fetching ISA and GS Segment Values From Interchange Envelope and Mapping
- Logic Apps : For Each Inside a For Each - Fetching values from field in an array inside an array


Great Article, what the hell is the TargetURL setting?
ReplyDeletethis has been such a great resource. thank you.
ReplyDeleteHello, the demo wouldn't work, as CallerAADApp is not authorized to use DevTADApp. Similar to how users would need to be authorized to use it (by putting them in the "Users and Groups" tab in enterprise app view), the Caller App needs to get authorized as well.
ReplyDeleteHow do you solve that?
Thank you for the article.
ReplyDeleteI was able to find one config missing in my side by going through the article.